**Broiler Brooding Techniques and Pheasant Rearing Practices**
Proper brooding techniques are crucial for the successful rearing of pheasants, especially during the first 20 days of their life. With good management, the survival rate of commercial pheasants can exceed 95%. Poor practices, however, can lead to significant losses. Based on over a decade of breeding experience, it's clear that effective measures in insulation, feeding, and disease prevention play a key role in improving the survival rate of pheasant chicks.
**1. Insulation and Temperature Control**
A suitable insulated shed should be constructed based on the number of pheasants being raised. The recommended density is around 80 birds per square meter. For larger flocks, it’s best to divide them into smaller groups, separated by 30 cm high cardboard partitions. The insulation structure can be built using bamboo poles, nylon film, and cotton wool placed 80–100 cm above the ground. For smaller numbers (200–500 birds), cardboard or other materials can be used to create small enclosures. A layer of dry wood chips or rice husks (about 5 cm thick) is laid on the floor, covered with burlap sacks to prevent chicks from eating the wood chips. These sacks can be removed after four days.
Infrared bulbs (250W) should be evenly suspended 20–30 cm above the ground. The number of bulbs depends on whether the temperature reaches the desired level. Electric heating pipes or cables can also be used as heat sources. The temperature must be carefully controlled: 37°C for the first 1–3 days, 35–36°C in the second week, 33–34°C in the third week, and 30–31°C in the fourth week. Fluctuations should be minimal, and the temperature should be adjusted based on the chicks' behavior. If they gather under the heat source, they may be too cold; if they move away and breathe heavily, it may be too hot. After five days, reduce light intensity by using red or blue bulbs or shading to avoid overstimulation.
**2. Feeding Practices**
Chicks should be fed with full-price feed such as 510 or 310. During the first four days, large particles should be sifted out. From day 1 to 3, feed should be spread evenly on sacks, then gradually moved to troughs. Feed should always be available. At one month old, switch to 511 feed. For meat production, limit feeding should begin at three months of age.
**3. Disease Prevention**
To prevent diseases like white diarrhea and coccidiosis, start with potassium permanganate in drinking water. From day 1–3, administer 2000 units of penicillin and streptomycin per chick. From day 4–6, add terramycin or norfloxacin to the feed. Alternate these treatments until day 15. Every 10–15 days before 3 months, use coccidiostats. Administer Newcastle disease II vaccine via drinking water or nasal drops between 10–15 days of age. Inject Newcastle disease I vaccine one month before and after egg-laying.
**Indoor Pheasant Breeding Techniques**
Traditional methods often require large facilities with open spaces and shelters. However, through years of practice, we have developed an indoor, light-free culture system that simplifies the process and reduces costs. This method has been widely adopted by local farmers.
Use existing farm buildings, ideally 15–50 square meters. Lay 5 cm of dry wood chips, rice husks, or straw. Seal all windows and doors with cardboard or cloth to block out light. An insulated shed should be created inside, with 80 birds per square meter. Heat the area to 37°C and provide a 15–40W bulb for lighting. After 30 days, keep the lights on constantly to maintain darkness. In this environment, pheasants become less active and stop flying, which increases growth rate, reduces casualties, and allows higher stocking densities.
At 50 days, you can cull the flock, and by 105 days, they will be ready for market. Their feathers are vibrant and highly sought after. Alternatively, at five months, remove window shades, allow natural light, and clip the wings to prevent flying. Maintain a male-to-female ratio of 1:4, with a density of 2–3 birds per square meter. Egg production can begin within a month.
This technique not only improves efficiency but also enhances profitability, making it a valuable approach for modern pheasant farming.
Plastic Net
Plastic Net
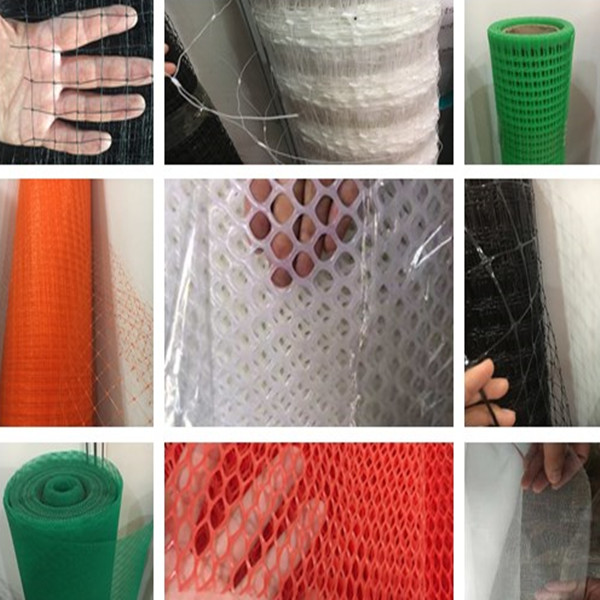
The plastic net including plastic flat net, plastic slope protection net, slope greening vegetation net, plastic breeding fence net, plastic plant support net, plastic anti-bird/insect nets, plastic filter net, etc.
The texture of material :PE/ PV/ PP + UV anti-acid and alkali , anti aging, corrosion resistance .
Color : transparent, white, silvery grey, green, black, etc. It's can be do as per customer's requirement.
Main uses: slope protection, greening and vegetation, crops plants supporting, anti bird and insects, breeding fence, building, internal and external wall coating lining nets, buried line warning logo, etc.
The advantages of plastic net :
solid structure
easy to set up
economic for applying
high stengthand stretching
creepage resistance, aging resistance
stable performance
impact resistance
The plastic net is ideal choice for production of new composite materials .

Plastic Net,Plastic Slope Protection Net,Anti Bird and Insect Net,Plastic Flat Net,Polyester Belt
ANPING COUNTY SHANGCHEN WIREMESH PRODUCTS CO.,LTD , https://www.scwiremesh.com
